Introduction
Getting started
Learn how to get Concierge set up and working in under 5 minutes.
Set up
Learn how to get started with Concierge and make it fit your organization.
Architecture guide
Learn how the internals work and contribute.
Important terms
When using Concierge, you'll need to understand the following terms:
- Service Request: A request for one or more Service Resources from a user in your organization.
- Service Resource: A resource that will be deployed or provided by IT that is requested as part of a Service Request.
- Review Request: A request for a Service Request review made to a person who can approve it.
- Policy: A set of rules that govern how a Service Request is handled.
- Notification: A message that is sent to a user when a Service Request is about to expire.
- Location: A physical or cloud location where a Service Resource is stored.
Quick start
Because Concierge is a Software as a Service (SaaS) application, there is no software for you to install or manage in your own environment, making it easy to get started.
To get started, please visit the registration page and create an account.
Integrating with Azure Active Directory
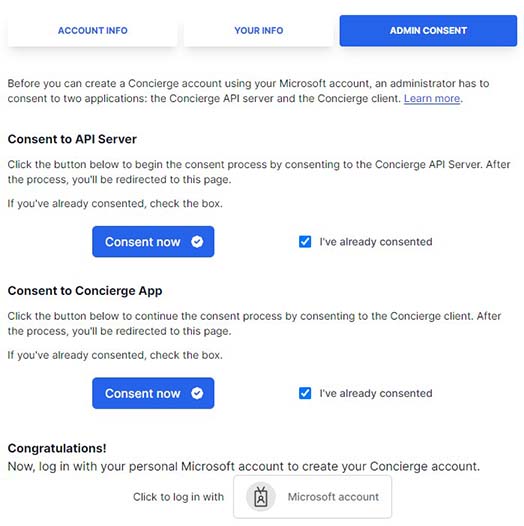
A decision when you're creating your Concierge account is whether you want to integrate with Azure Active Directory. If your organization has an Azure Active Directory account, you should enable this, because it will enable Concierge to syncronize user information with your Azure Active Directory.
There are two urls that an Administrator should consent to in order to enable Azure Active Directory integration. These urls are for the:
- Concierge API Server
- Concierge Client Application

If you don't have an Azure Active Directory account, you can skip this step. In this case, you'll just create your Concierge account with an email address and password.
Pro tip
If you create your account without Azure Active Directory integration, you can always go back and add it later.
Configuring Concierge
Once you've created your Concierge account, there are a few things you need to do to get it up and running.
Visit the Admin Settings page and customize your locations and notifications policies. The default notification policies are fine for most organizations. However, you can override them if you need to.
Invite users! You can invite users to your Concierge account. The application doesn't really do much without users, so you should bring some people to your organization. They'll be able to get started right away.
Basic usage
The basic operation is simple to understand and to use. Users can create Service Requests to request resources from your organization. Once they've created a Service Request, it will be assigned a Policy and the policy will define if it needs review by others to approve or reject it. Once approved, the Service Request will be provisioned by IT and managed by Concierge.
Service Requests generally have a defined lifetime. Once the lifetime has expired, the ownew of the Service Request will either return it to IT for deletion or request an extension. This is a feature that Concierge provides to help you manage your resources.
You're in charge
You create the Policies that are in use, so you can determine important topics like Service Request lifetimes and what approvals, if any, are required to process a Service Request.
Service Requests
A Service Request is a request from a user to IT for resources. A Service Request is created by a user for one more different types of Service Resources such as a virtual machine, a database, an email address, or other resource.
Once a Service Request has been created, it will be assigned a Policy, which are the rules that it will operate under.
Policies
When you create your account, Concierge already has a policy! It states that every request will be automatically approved and forwarded to IT for deployment. This is the default policy.
Even if you just stick with this default policy, you'll get many benefits.
- You'll know who is using each resource you create.
- You'll know when a resource is in use, because it will have to be extended at the end of its initial lifetime.
- You'll have a framework in place to manage updates or changes to these resources over time.
But, you can also create your own policies. These might help you answer other questions like:
- Who approved this resource?
- When was this resource transferred to another user?
Getting help
If you have questions or need help, we are here to help you! Please review this documentation and the Knowledge Base to see if your question is already answered.
If you still need help, please open a ticket and we'll respond within one business day.
Knowledge Base
You can access our Knowledge Base at https://support.cloudscope.io/support/solutions/60000323073.
Submit an issue
We provide support over email. To open a ticket, please send an email or visit our support site.

